
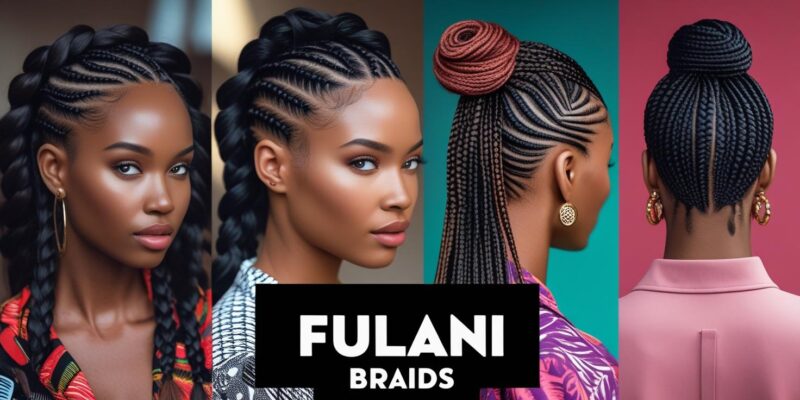
Fulani braids represent one of the most stunning and culturally rich protective hairstyles you can master. Originating from the Fulani people of West Africa, these intricate braids combine traditional cornrows with loose braids, creating a beautiful contrast that’s both elegant and practical. Whether you’re looking to switch up your look or protect your natural hair, learning to create Fulani braids will add a versatile skill to your hair styling repertoire.
This comprehensive guide will walk you through everything you need to know about creating these gorgeous braids, from gathering the right tools to maintaining your finished style. By the end, you’ll have the confidence and knowledge to create this timeless look at home.
What Makes Fulani Braids Special
Fulani braids stand out among protective hairstyles because of their unique combination of elements. The style typically features cornrows at the front and sides of the head, while the back section is left with loose individual braids that can hang freely or be styled in various ways. This blend creates visual interest and allows for multiple styling options within a single look.
The cultural significance of these braids runs deep. The Fulani people have worn variations of this style for centuries, often incorporating beads, cowrie shells, and metal accessories that hold spiritual and social meaning. Today, these braids have gained popularity worldwide while maintaining their cultural roots and significance.
What sets Fulani braids apart from other protective styles is their versatility. You can wear them sleek and simple for professional settings, or dress them up with accessories for special occasions. The combination of tight cornrows and loose braids also provides excellent protection for your natural hair while allowing for easy maintenance.
Essential Tools and Materials
Before you begin braiding, gathering the right supplies will make your braiding session smoother and more successful. Here’s what you’ll need:
Hair Products:
- Leave-in conditioner or moisturizing cream
- Edge control or gel for smooth partings
- Hair oil (coconut, jojoba, or your preferred choice)
- Braiding spray for slip and moisture
Tools:
- Rat-tail comb for precise parting
- Wide-tooth comb for detangling
- Hair clips to section hair
- Small rubber bands or hair ties
- Spray bottle with water
Extensions (Optional):
- Kanekalon braiding hair or human hair extensions
- Choose colors that match your natural hair or experiment with highlights
Accessories:
- Beads in various sizes and colors
- Hair rings or cuffs
- Thread for wrapping (optional)
Having everything organized and within reach will prevent interruptions during the braiding process and help you maintain consistent tension throughout.
Preparing Your Hair
Proper preparation is crucial for achieving long-lasting, healthy-looking Fulani braids. Start with clean, well-moisturized hair to create the best foundation for your braids.
Begin by washing your hair with a clarifying shampoo to remove any product buildup. Follow with a deep conditioning treatment to ensure your hair is properly moisturized before braiding. This step is especially important because you’ll be wearing the style for several weeks.
Once your hair is clean and conditioned, apply a leave-in conditioner throughout your hair, paying special attention to the ends. This will provide ongoing moisture and make the braiding process easier. If you’re using extensions, prepare them by lightly misting with water and applying a small amount of oil to reduce frizz and make them more manageable.
Detangle your hair thoroughly using a wide-tooth comb, starting from the ends and working your way up to the roots. This prevents unnecessary breakage and ensures smooth, even braids. If your hair is particularly tangled, work in sections and be patient – rushing this step can lead to damage.
Step-by-Step Braiding Process
Creating the Foundation Cornrows
Start by sectioning your hair into the pattern you want your cornrows to follow. Traditional Fulani styles often feature cornrows that curve along the hairline and sides of the head. Use your rat-tail comb to create clean, even parts, and clip away sections you’re not working on.
Begin your first cornrow at the front hairline. Take a small triangular section of hair and divide it into three equal parts. Start braiding by crossing the right section over the middle, then the left section over the new middle. As you continue braiding along the scalp, gradually add small amounts of hair from each side into the outer sections of the braid.
Maintain consistent tension throughout the braiding process – tight enough to create a neat, long-lasting style, but not so tight that it causes pain or stress on your scalp. The braid should lay flat against your head without pulling or puckering the skin.
Continue this process until you’ve completed all your planned cornrows. Typically, Fulani styles feature 4-6 cornrows along the front and sides, but you can adjust this number based on your preference and hair density.
Adding Individual Braids
Once your cornrows are complete, it’s time to create the loose braids that give Fulani braids their distinctive look. Section the remaining hair at the back of your head into portions that will create your desired number of individual braids.
If you’re using extensions, now is the time to add them. Take a section of extension hair and fold it in half, then place the folded end at the root of your natural hair section. Begin braiding by incorporating the extension hair with your natural hair, creating three even sections.
Braid each section from root to tip, maintaining even tension throughout. The individual braids should be neat and uniform in size, though slight variations can add to the natural, handmade appeal of the style.
Secure each braid at the end with a small rubber band. If you prefer, you can leave the very ends of the extensions unbraided for a more textured finish.
Styling and Customization Options
One of the most appealing aspects of Fulani braids is their styling versatility. Once your braids are complete, you can customize them in numerous ways to suit different occasions and personal preferences.
For a classic look, simply let the individual braids hang naturally. You can part them in the middle, to one side, or sweep them all to one shoulder for an asymmetrical style. The cornrows at the front create a beautiful frame for your face while keeping hair away from your eyes.
Adding accessories is where Fulani braids truly shine among protective hairstyles. Traditional beads can be threaded onto individual braids at various points along their length. Metal cuffs or rings can be added for a more modern touch. Some people choose to wrap sections of their braids with colored thread, creating beautiful patterns and adding visual interest.
You can also experiment with updos by gathering the loose braids into ponytails, buns, or half-up styles. The combination of the fixed cornrows and moveable individual braids creates unique opportunities for creative styling that other braided looks simply can’t match.
Maintenance and Care Tips
Proper maintenance will extend the life of your Fulani braids and keep your natural hair healthy underneath. Establish a routine that keeps both your braids and scalp clean and moisturized.
Sleep with a silk or satin bonnet or pillowcase to reduce friction and prevent frizz. During the day, avoid excessive touching or manipulation of the braids, which can cause them to become loose or frizzy prematurely.
Clean your scalp regularly using a diluted shampoo applied with a squeeze bottle, focusing on the scalp rather than the braids themselves. Follow up with a light oil applied to your scalp and along the length of the braids to maintain moisture.
Pay attention to your edges and the areas where cornrows begin. These areas experience the most tension and may need extra care. Apply edge control sparingly and avoid styles that pull too tightly on these delicate areas.
Conclusion
Mastering Fulani braids opens up a world of beautiful, protective styling options that celebrate both tradition and personal creativity. This step-by-step approach ensures you’ll create braids that not only look stunning but also protect and nourish your natural hair.
Remember that perfection comes with practice. Your first attempt may not look exactly as you envisioned, but each time you create this style, your technique will improve. Take your time, be patient with yourself, and don’t hesitate to ask for help if needed.
With proper care and maintenance, your Fulani braids can last 4-8 weeks, giving you gorgeous, low-maintenance hair that works for any occasion. Whether you’re heading to work, attending a special event, or simply want to try something new, these braids provide the perfect combination of style, protection, and cultural appreciation.
Start practicing these techniques, and soon you’ll be creating beautiful Fulani braids that showcase both your braiding skills and your personal style.


Comments